If you are a Small Business volunteer who works with a group that does anything with fiber or textiles and had to deal with some aspect of quality control, chances are you've wondered what kind of materials your group is actually using. So, you ask your group, "what is this made of?"
Many times the reply would be "sufa" (wool).
For me, my response was, "Hmmm..." I'd think to myself, I don't think so...
In my case my cooperative was making mostly knit gloves for winter at the time. They were using a yarn that they'd have stranded together at the local yarn shop to make it as thick or thin as they wanted. It was a "fuzzy" yarn, and kind of scratchy, but it wasn't wool.
At first it was difficult because my language skills weren't as developed. Maybe they know it's not wool, they just don't have a word for synthetic. Or maybe they really thought it was wool.
So later on we had a little chat and I explained the difference between wool and acrylic. That was really all my cooperative needed. For the types of products the cooperative makes now, it isn't important that they use wool or even cotton for them to be appealing to a tourist or export market. In fact, using the acrylic yarns that they use work better for making their coin purses because they are easily washed, the colors don't bleed, and the yarn has a slight sheen to it.
But for some cooperatives, especially those who make carpets and want to export them, it's really important that they at least know the fiber content of their products.
About a year ago I was talking to a fellow volunteer (Lynn) who was having this problem with her group. That's when I remembered the Fiber Burn Chart that I had learned about in my Fibers class back in college. I showed her the chart, and since then she's been burning just about every yarn in sight wherever she goes! The link above explains the simple process of burning unknown fiber to see what it's made from. It's a great resource for volunteers working with textile-based cooperatives. I love to hear Lynn's stories about bringing her lighter to her cooperative and showing the women if a yarn is wool or not. It's been very enlightening for the women.
Tuesday, August 31, 2010
Monday, August 30, 2010
Fun, Easy, and Cheap Jewelry Projects
If your a current Small Business Development or Youth Development Volunteer in Morocco you've probably heard of the Art Resource Manual (ARM) that two of my stagemates (Hillary and Lisa) are putting together. They're really trying to put together a great resource for future volunteers so that they don't have to recreate the wheel. I'm trying to help them out by putting together some of the projects that I've done here in country that I think other volunteers could benifit from.
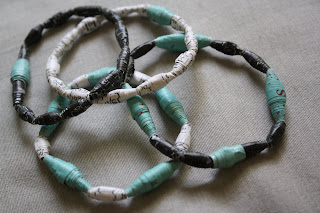
In this post I will give a how to for making paper beads and will show examples of some finished jewelry pieces that I've made with the paper beads, as well as the felt beads from my last post; Felt Beads, How To. I got the idea for trying the paper bead project from a CraftSanity blog post. On Jennifer's blog she even has an awesome video of a TV segment where she demonstrates the process. But for the benifit of ARM, as well as all you volunteers that might not have a fast enough internet connection to view the video, I'm going to go through the process of making the beads step-by-step.
How To Make Paper Beads
Materials needed:
Old Magazines
Glue (I found mine at the hardware store)
Paint brush (small)
Something to form the bead around such as knitting needles, pens, etc. (I like beads with small holes so I use a very skinny knitting needle. They are widely available in Morocco)
Step one
cut up some magazine pages into long triangular pieces. Play around with the length and width of the pieces because they will make differently shaped beads. Try to keep the triangles uniform if you want your beads to be a similar size and shape (duh).
Step two
Paint the glue onto the wrong side of the magazine (the side you don't want to see). Start the glue about one inch from wide end. If your glue starts all the way at the wide end then you will glue it to whatever you are making your bead with (oops).
Step three
Starting at the wide end, tightly wrap the paper around the knitting needle/pen. Go slowly so that it looks pretty!
Add just a little more glue to the point and hold it in place for a second or two to secure it well.
Step four
Generously add a coat of glue to the entire bead and let dry in a way that the bead is not touching any surface
Now you know how to make a paper bead so make LOTS of them and you too can make beautiful jewelry! The following photos are some necklaces, bracelets, and earrings that I made this week using paper beads. The other materials that you'll see were also obtained in Morocco. The earring posts and necklace clasps were bought in the Rabat Medina. The seed beads were bought right in my own site (you buy them by weight. Two dirhims' worth of each color will go pretty far). And the "string" is actually unwaxed dental floss from our medical kit (because who uses unwaxed dental foss?). The only thing that I used that I did not get in Morocco was the skinny elastic inside the bracelets (the ones without the clasp). If you look around I think you can get it here, but I happened to have some that I brought from the US. Remember that you can make great necklaces even with just some string or thread, so if you can't make it to Rabat or find fasteners near you, you can still do this project. Use your imagination!
And as promised, here are a few new pieces using the felted beads:
Friday, August 27, 2010
Felt Beads; How To
Making felted beads is a easy and fun project to do. Whether your working with a women's cooperative, a group of kids at Spring Camp or your just a little board over the weekend, this is the project for you. It's a very low tech process and the materials that you will need are easily available in Morocco.
Materials needed:
Wool fleece or wool yarn
Two buckets or bowls
Hot water
Cold water
Soap (such as Hammam soap, dish soap, or shampoo)
Carders (optional)
First you will need to find some wool. Clean fleece that hasn't yet been made into yarn is best. In my site I do not have fleece available so I'm using wool yarn. This is more work, as it needs to be unwound and carefully pulled apart. (If you do choose to use yarn, do make sure that it is actually wool and not some other fiber. If you do not use wool you will not be able to make felt.)
At this point it is best to card the wool, so as to further separate the fibers, making them nice a fluffy. If you have women who spin yarn in your community I encourage you to have them help you with this part. Otherwise, you can pick up some good pointers here.
You can also use the carders to mix two or more colors together.
Now it's time to felt! Fill one bucket with hot water and a little soap. The water should be as hot as you can stand to put your hands into it (so not boiling). Fill your other bucket with cold water. It should be as could as you can get it so if you have a refrigerator or a cold water spring nearby great. The soap will help to strip the natural oils from the wool and help it felt better while the hot and cold water will "shock" it into felting.
Take some of your newly carded wool and dip it into the hot soapy water.
Now take the wad of wool and roll it into a ball using your palms. After a few seconds of rolling, drop the ball into the cold water and repeat the process. Go back and forth between the hot and cold water until you have a tightly formed bead.
Wool is an inexpensive and plentiful resource here in Morocco, which makes this project especially easy to do with groups or individuals that might not have a lot of other resources at their disposal. String these beads on some yarn and you have a necklace! If you want to get "fancy" you can find some elastic and make some bracelets or some erring posts. I was able to find earring posts in Rabat and I know that they are also available in Ouarzazate, so keep your eyes open.
Thursday, August 26, 2010
Felting; A Lesson in Workshop Preparedness
Over the past two years I've had the opportunity to conduct a few workshops both with host country nationals as well as with Peace Corps volunteers. Each has been a uniquely different learning experience, mostly for myself.
About two weeks ago I agreed to facilitate a felting workshop at another volunteers' site. Felting is something that I do not consider myself an expert on. I learned the basics in my intro to fibers class back in college and felt confident that I had retained the important aspects of it, brushing up with a few YouTube videos just in case. I had about a week to prepare for the event so I worked on making samples of what is possible with felting. The group that I was going to be working with works mostly with knit wool, so I knitted two mostly identical swatches and proceeded to felt one of them so as to illustrate the difference in size and texture between the two fabrics. Next I felted a few beads, making two of them into a pair of earrings to show the ladies.
Finally, I wanted to create some felted...felt. I was able to find hand carders in my site, a tool I never actually used in college, but was unable to find the raw fleece itself. I tried ripping apart some wool yarn to use (which was good enough for making the beads), but it was clear that this was not going to work. I asked the volunteer that I was collaborating with if fleece was easily available in her site and if they would have it on hand for the workshop. This meant that I would have to go into the workshop with no example, no visual aid for this process which made me a little apprehensive about the workshop.
On the day of the workshop I arrived in the volunteers' site around 11:30am. After gathering the things I needed for the workshop and talking with the volunteer about what I would be showing the women, we headed over to their home. By this time it was 12 or 12:30 and after waiting on the doorstep for a few long moments under the hot August sun the door was opened. It was clear that we had interrupted the womans Ramadan sleep schedule. We then sat in her salon for several minutes while she obtained fleece from her "stash." The fleece she produced was dirty and matted and had been used as pillow fluff up until that moment.
At this point my Peace Corps college was apologizing and assuring me that she had indeed notified this woman about the workshop two days prior. These things, I have come to learn, happen and now I had to "make it work." The biggest obstacle in my opinion was the host country womans lack of motivation and excitement over learning this new process. Luckily, her sister was around and joined in on the workshop. At least she was interested and willing to participate.
I first showed the women the samples that I had brought and briefly explained how I made the beads and how I had felted the knitted swatch. I was met with blank stares and decided to just get some wool into their hands so that they could make something.
The first thing we made were the felted beads. To make the beads we took some of the matted fleece in our hands, loosened it up by separating the fibers then dunking the tuft of fluff into alternating bowls of hot soapy water and ice cold water. Each time we removed the piece of wool from the water we rolled it in our hands to create a tight ball, as tight as we could make it.
It was then time to try to make the felt. I tried to explain that we needed to card the wool first, but that I wasn't very good at carding. That was my hint to the women which was supposed to mean "hey here's your chance to actually do something! Why not just help me!?" The concept was lost until I actually started carding and it was clear that we'd be there all day if they didn't step in to help, that was when one of the women reluctantly took over carding.
I proceeded to arrange the carded wool in the way that I was taught many years ago. The result was a very thick piece of wool and tender hands from dipping them into the scolding hot water. Shortly after starting my felting presentation the other, more enthusiastic sister told me that she'd seen this on TV, but said that in fact you didn't have to shock the wool (as I was doing with the hot and cold water), just use room temperature water with lots of soap. Now, I'm all for experimentation, but I didn't enjoy being contradicted in the middle of the workshop. The problem was that with no physical examples of something finished that they could make with the felt they had no idea what I was really talking about. It also meant that I had no authority to tell them how to make felt.
I was about ready to throw in the towel and wrap up the workshop when the non-enthusiastic-about-felting-sister inquired about a couple of unfinished coin purses that were stuck in the bag with the rest of my supplies. At that moment I dreaded with every fiber of my being what I was sure would come next, the question, "will you show me how you did this?" As much as felting is not my forte at this juncture of my life, crocheting with two colors in the round is something that I've mostly mastered since coming to Morocco. I enjoy doing it, and just as importantly, I enjoy teaching Moroccan Women as well as fellow Peace Corps volunteers how to do it. Now everyone learns differently and at their own speed, but considering that it took me four days and over 30 hours to teach two ladies in a different volunteers' site recently (more on that later), I just knew I didn't have the energy to go down this road with this woman. As a compromise I sat down and crochet one small flower motif, explaining what I was doing as I went and showed her how what I did corresponded to the directions I had written out. Afterward I gave her the crochet sample along with a copy of the written directions.
The volunteer who's site this was is very enthusiastic about working with other girls in the community to make jewelry out of the felted beads, since there are many girls in her small town with nothing to do. I hope that this project works out for them, so that some good will come of this workshop. I guess we'll just have to wait and see, like so many other projects here in Morocco.
About two weeks ago I agreed to facilitate a felting workshop at another volunteers' site. Felting is something that I do not consider myself an expert on. I learned the basics in my intro to fibers class back in college and felt confident that I had retained the important aspects of it, brushing up with a few YouTube videos just in case. I had about a week to prepare for the event so I worked on making samples of what is possible with felting. The group that I was going to be working with works mostly with knit wool, so I knitted two mostly identical swatches and proceeded to felt one of them so as to illustrate the difference in size and texture between the two fabrics. Next I felted a few beads, making two of them into a pair of earrings to show the ladies.
Finally, I wanted to create some felted...felt. I was able to find hand carders in my site, a tool I never actually used in college, but was unable to find the raw fleece itself. I tried ripping apart some wool yarn to use (which was good enough for making the beads), but it was clear that this was not going to work. I asked the volunteer that I was collaborating with if fleece was easily available in her site and if they would have it on hand for the workshop. This meant that I would have to go into the workshop with no example, no visual aid for this process which made me a little apprehensive about the workshop.
On the day of the workshop I arrived in the volunteers' site around 11:30am. After gathering the things I needed for the workshop and talking with the volunteer about what I would be showing the women, we headed over to their home. By this time it was 12 or 12:30 and after waiting on the doorstep for a few long moments under the hot August sun the door was opened. It was clear that we had interrupted the womans Ramadan sleep schedule. We then sat in her salon for several minutes while she obtained fleece from her "stash." The fleece she produced was dirty and matted and had been used as pillow fluff up until that moment.
At this point my Peace Corps college was apologizing and assuring me that she had indeed notified this woman about the workshop two days prior. These things, I have come to learn, happen and now I had to "make it work." The biggest obstacle in my opinion was the host country womans lack of motivation and excitement over learning this new process. Luckily, her sister was around and joined in on the workshop. At least she was interested and willing to participate.
I first showed the women the samples that I had brought and briefly explained how I made the beads and how I had felted the knitted swatch. I was met with blank stares and decided to just get some wool into their hands so that they could make something.
The first thing we made were the felted beads. To make the beads we took some of the matted fleece in our hands, loosened it up by separating the fibers then dunking the tuft of fluff into alternating bowls of hot soapy water and ice cold water. Each time we removed the piece of wool from the water we rolled it in our hands to create a tight ball, as tight as we could make it.
It was then time to try to make the felt. I tried to explain that we needed to card the wool first, but that I wasn't very good at carding. That was my hint to the women which was supposed to mean "hey here's your chance to actually do something! Why not just help me!?" The concept was lost until I actually started carding and it was clear that we'd be there all day if they didn't step in to help, that was when one of the women reluctantly took over carding.
I proceeded to arrange the carded wool in the way that I was taught many years ago. The result was a very thick piece of wool and tender hands from dipping them into the scolding hot water. Shortly after starting my felting presentation the other, more enthusiastic sister told me that she'd seen this on TV, but said that in fact you didn't have to shock the wool (as I was doing with the hot and cold water), just use room temperature water with lots of soap. Now, I'm all for experimentation, but I didn't enjoy being contradicted in the middle of the workshop. The problem was that with no physical examples of something finished that they could make with the felt they had no idea what I was really talking about. It also meant that I had no authority to tell them how to make felt.
I was about ready to throw in the towel and wrap up the workshop when the non-enthusiastic-about-felting-sister inquired about a couple of unfinished coin purses that were stuck in the bag with the rest of my supplies. At that moment I dreaded with every fiber of my being what I was sure would come next, the question, "will you show me how you did this?" As much as felting is not my forte at this juncture of my life, crocheting with two colors in the round is something that I've mostly mastered since coming to Morocco. I enjoy doing it, and just as importantly, I enjoy teaching Moroccan Women as well as fellow Peace Corps volunteers how to do it. Now everyone learns differently and at their own speed, but considering that it took me four days and over 30 hours to teach two ladies in a different volunteers' site recently (more on that later), I just knew I didn't have the energy to go down this road with this woman. As a compromise I sat down and crochet one small flower motif, explaining what I was doing as I went and showed her how what I did corresponded to the directions I had written out. Afterward I gave her the crochet sample along with a copy of the written directions.
The volunteer who's site this was is very enthusiastic about working with other girls in the community to make jewelry out of the felted beads, since there are many girls in her small town with nothing to do. I hope that this project works out for them, so that some good will come of this workshop. I guess we'll just have to wait and see, like so many other projects here in Morocco.
Friday, August 13, 2010
Creating a Business Card
Yesterday a fellow volunteer asked me how I created "attractive, simple and inexpensive business cards" for my cooperative. I promptly emailed her an explanation of the process but then I thought, why not just make a blog post about it so everyone can see and know what I did? That's the great thing about blogs, they are such an easy way of sharing ideas with a large group of people!
There are many ways that you can go about creating a business card. The process that I used involves Adobe Illustrator, which I know not everyone has available to them. If you don't have Adobe Illustrator you can use any program that allows you to combine photos with text. The advantage to using Illustrator is that it is a vector based program, which leaves your text looking crisp and clear, not pixellated and fussy.
Before you get started you need to first come up with a plan for what you want your business card to look like. When working with cooperatives and associations, it is important that you ask the opinion of the people you are making the card for because even if they are unable to create the card themselves, they will feel that they have had input into the final results. In my case, the women initiated this business card project after they went to their first Marche Maroc in Fes. Many of the other artisan groups at the craft fair had business cards and they enjoyed going around collecting them from the other groups. These business cards widely varied in terms of quality and style. Some looked like a professional business cards, some were in color, and some were just small slips of paper printed with a photo copier. The ladies of Al-Falah could pick out the nicer ones right away and decided that they needed a good looking business card.
We talked about what they wanted the business card to include and it became clear that they didn't really understand what the purpose of a business card should be. They wanted a LOT of information on the card. In addition to the name of their cooperative, name of the town and contact information, they wanted to include a description of what they do. The issue with this is that this particular cooperative doesn't focus on just one type of thing like weaving or woodcarving, and to include a list of everything that they do would make the card cluttered and hard to read. They also wanted many photos on the card of the different types of products that they make. At this point I needed to explain the difference between a business card and a brochure. I also explained that people are going to realize immediately what they do because the business cards would be available at craft fairs where their products would be on display. With this new knowledge they decided to go with a more simplified version and only include the most pertinent information.
Since Jon had already gone through this process several months before with his cooperative, and since the two cooperatives work in the same Artisana, I thought it would be nice if the cards retained a similar look and feel. Below is the business card that Jon created.
I used this business card a template for the one I would make. I liked the idea of having the photo also serve as the background for the text and I used the same fonts. For the women's card I had the idea of doing a very close up detailed shot for the image so as to emphasis the detailed nature of their work. I also wanted there marketing materials to look cohesive. Before making the cards I suggested that they make themselves a table banner for upcoming fairs. The image on the business card is actually a close up of the border of this banner.
After taking many photos of embroidery I was ready to create the card. I measured an actual business card to get the dimensions then plugged in those numbers to create the size of the Illustrator file. I then imported, shrunk, and positioned the photo. Next I wrote the text on top of the photo using the type tool. That was about it.
To print the cards I went to a place that prints photos. The end result is that they essentially have business card-sized photos with their co-op name and info printed on them. The cost was 1/2 DH per card. Not supper cheap but half the cost as what we paid for our Peace Corps business cards. Below is the finished product complete with a crochet display stand!
Subscribe to:
Posts (Atom)