Showing posts with label handmade paper. Show all posts

Sunday, October 24, 2010

A Week In Paper Making

This past week was very eventful for the Al Falah cooperative. This is the week that we finally made paper in the Artisana.


I'm really grateful to all the volunteers who ordered large greeting cards and bookmarks from the coop. I'm afraid that without these orders the ladies would not have been motivated enough to make paper again before I left, mostly due to the fact that Fatima and Hefida (the two members that have made paper before) have been and will be traveling a lot recently.


They made twenty two sheets of paper on Tuesday all by themselves, meaning that I only supervised the operation and gave them little reminders when I saw that they had forgotten a step, but I did not form a single sheet of that paper.


I was very pleased to see Fatima and Hefida explain the process to the other girls present. They were visually proud that they knew this very unusual skill, and that they were already so proficient at it.


By Thursday morning the paper was already dry and they were ready to tear down the sheets to make cards and bookmarks and cut out envelopes from a pattern I had made.


Hefida worked on drawing out new designs for the cards and both Hefida and Ashora worked on embroidering them.


By Friday they had two cards complete with another on the way. They have orders for a total of ten cards and three or four bookmarks, which they wont have any trouble filling by their deadline of November 9th. They do very well filling orders using the color chart of embroidery threads I made for them back when they were working with Mushmina making t-shirts. (To see an Al Falah t-shirt for sale click here.)


I'm really hoping that they will stick with this project and that the next volunteer encourages them to expand their line of paper products. Because greeting cards are not really appealing to the Moroccan market (for the most part), it will be very important that they continue going to craft fairs that cater to a tourist market if they choose to continue with this product line.

Friday, September 17, 2010

Top ten memories of Morocco: Emily

Yesterday, Jon posted his top ten memories of Morocco, and wanted me to do the same. I will say that we came up with our lists completely independently of each other and I haven't yet read what he's written, (which is killing me) and that's why I was so motivated to come up with my "top ten" as soon as possible. It was a little hard to narrow it down to ten, and most of my favorite memories happened over several days, weeks, or months. I've arranged my list in roughly chronological order.

Our first Eid Kabir

For our first Eid Kabir we were still in home stay. We had seen pictures of Eid kabirs from other volunteers, so we had an idea of what to expect...the sheep slaughter in particular. The morning of Eid felt very much like any big holiday back in the States. We got dressed up and went over to Rachida's mother's house to visit and eat sweets then went back home to prepare for the festivities. The sheep was brought to the roof were we had the chance to look it in the eye for a few hours, knowing it's fate. Our host mom, Rachida, started the mijmare (small grill) that we'd use to cook the organ meat right after the slaughter. The mijmare is fueled by charcoal and is quite tricky to get going. As luck would have it it started to rain, so we moved indoors; grill, sheep and all. Since a woman isn't allowed to kill the sheep and our host brother was either still too young or inexperienced or both, a man came over to do the job. The sheep was killed over the bathroom toilet, so that it's blood would flow down the drain. We all gathered around the doorway to watch, but I started to feel sick to my stomach so I turned away after a while. After the sheep was skinned and the organs removed, our brother started grilling them over the mijmar in the living room, filling the house with smoke and causing our smoke detector to go off. My eyes became so irritated from the smoke that I had to stand by an open window. The organ meat was wrapped in fat, seasoned with salt, pepper, and cumin, and eaten with bread. It's was one of the most delicious meals I've ever had here!


Trip to Merzouga and the Todra Gorge with fellow PCVs

This was a trip that happened fairly early on in our service, in March 2009. It was our first time in the southern region of Morocco, so the landscape alone was something completely foreign to us. It was a pretty typical trip I guess you can say and we did the same things that many other volunteers have done. We rode camels in Merzouga to a Berber camp site were we spent the night and climbed at least part way up the big dune and looked at the stars. In Todra we hiked up to the top of the gorge where we were rewarded with a beautiful view (and Jon was rewarded with a shoe shine, but that's a different story). It was a great opportunity to see the parts of Morocco that I tend to enjoy more...the smaller towns and rural areas. They beat Marrakesh and Fes any day. There was a core group of four volunteers that went, with others meeting up and leaving along the way, but always great company.


Spring Camp 2009

It was a crazy week of teaching English and art classes, playing unusual games, dancing, getting up early and going to bed WAY too late. Some highlights include;
One very intense game of ultimate Frisbee
Seeing one of the girls from my English class singing "The Hokie Pokie" to herself as she walked to lunch.
Singing "Bohemian Rhapsody" at the talent show with the other PCV counselors.
Learning circus tricks along with the kids
Attending one of the aerobics classes with all the teenage girls
Dressing up as a pirate for the costume party
Attending the awards ceremony the last night that lasted until 2 in the morning!


Paper making project
The paper making project has been an odyssey. From coming up with the idea, to constructing the mold and deckle, to gathering the materials, to teaching the women, to coming up with products to make out of it...it's been a long long process. To read more about the paper making project click here and here.


Learning to speak and write in a different language

Learning Darija was one of the hardest things I've ever done and something I'm glad that I had the opportunity to do. By the time I reached my mid 20s I thought I'd never have the chance to learn a second language, but here I am. I give all the credit of any language success to final tutor, Salima, who started teaching me in June, 2009. She was patient, persistent, and a great teacher. She taught me how to write in Arabic Script, and that really helped me with my pronunciation. Plus, it's really cool to be able to write things for my ladies and decipher signs. Though I feel self conscience about my language skills most of the time, it's nice when a complete stranger overhears me speaking to a shop keeper and strikes up a conversation with me because she can't believe how well I speak Arabic, which happened yesterday.


Day at the beach near Asilah

On a long holiday weekend during Ramadan in August 2009, Jon and I met up with several other volunteers, mostly from our staj, in Asilah, a coastal town in the north. On one of the days we took a trip to a place called Paradise Beach, just a few miles from town. We arrived early in the morning to find the most expansive, empty beach I've ever seen, and since it was the first or second day of Ramadan, it was practically empty. The tide was out and the sand was smooth and free of trash. We spent the day exploring the rocks, chasing seagulls, riding the waves on boogie boards, and lounging around under sun umbrellas reading.


Ain LeuH
This might be cheating, but I have three wonderful memories of Ain LeuH. The first was back in August, 2009 when we went there to participate in an Environment camp. The camp had many challenges but it was a great opportunity to meet with other volunteers and work with some really great kids. It was also when we first discovered Ain LeuH's treasure trove of blackberries and I made jam for the first time ever.


The Next time we went to Ain LeuH was for Christmas, 2009. It was pouring down rain on Christmas Eve as we made our way there from taxi to taxi. By the time we arrived we were soaked to the bone, but we were greatly rewarded. Randy's house (the volunteer who lives there) was warm, cozy and welcoming. Lisa and two of her friends from the US came as well and we spent the next two days making and eating delicious food, listening to Christmas music, and playing Scrabble. I made hand-knit Christmas gifts for everyone there and Santa even came and filled our stockings with treats. It was the most low-key, unstressfull Christmas I ever had, and although I missed my family back home, it was a wonderful experience. The picture below of Jon and Randy was taken the day after Christmas, as you can see, it ended up being a beautiful weekend.


Most recently we went back to Ain LeuH two more times in the last month for workshops and more blackberry picking. The site is beautiful and there is nothing better than getting up at 6 o'clock to pick some berries before anyone is out and the sun gets hot.

Marché Maroc
This again is a bit of a cheating response because there have been three Marché Maroc craft fairs, and I've enjoyed all of them. The best part of these craft fairs was seeing how much Fatima and Hefida grew and learned from their experiences attending them and how much fun they had each time. My work is a very important part of what I'm doing here (well, duh), but sometimes it's hard to pin point a specific time that was "memorable." It's the little things that happen on a daily basis that seem to add up, but the craft fairs gave me the chance to look back on my work here and see the bigger picture. For more on Marché Maroc, check out this post.


Learning Fesi embroidery
From early on in my service, I have been particularly interested in a specific style of embroidery made here in Morocco called "Fesi" Embroidery. Shortly before our Mid Service Medicals in December, 2009, I decided to ask the women at the cooperative to teach me how to do it. I do a lot of mini workshops with the women to teach them different crochet techniques, so it was nice to change roles and be the student for a while. Since my work primarily consists of product development and quality control, it was very helpful for me to learn the "right" way to do this embroidery and better understand the labor that's involved. Since I'm about the same age as the coop members I think it was good for them to see that I'm not afraid to try new things and therefore it's never too late for them to learn something new. In fact, after I started doing my embroidery sampler one of the coop members who didn't do fesi embroidery decided that she wanted to learn too! It took about four months, but I finally completed the sampler. For more on Fesi embroidery check out this and this.


Teaching crochet in the bled

This past July I had the opportunity to travel down south and teach a crochet workshop in the bled (small community in the countryside, in this case about 500 people strong). The site doesn't even have transportation all the way to it, so we had to walk in from the nearest town, which takes about an hour. Though most of the area is dry and desert-like, the town is in the middle of an oasis. It was an extremely quiet place with all mud-brick houses. It's basically what a lot of people think of when they think "Morocco." The two sisters that I taught were very excited to learn the two-color crochet technique that I went there to teach. The workshop was supposed to last two days, and be about 2-3 hours a day. It ended up spanning four days with our average day being 8 or 9 hours! It was a really intense time and we all learned a lot. I really enjoyed how welcome the sisters and the rest of their family made me feel. It was very easy to joke around and talk with them. On my last day I even learned how to make cannon bread, which is a specific type of bread that I've only seen made in that area.


Wednesday, June 16, 2010

Paper Making Tutorial Part 4

In this post I will;
-Teach you how to make paper with step-by-step instructions!

Ready?

Here we go!

Before you begin, you will need to prepare the surface where you will transfer your paper sheets. Take your wood board and place it on a flat surface near your tub. Place two or three blankets on top of the board to make a cushiony surface, then place a pressing cloth (bed sheet) on top of those. Line up all edges and smooth out any wrinkles. Your board, blankets, and pressing cloth should all be the same size.

Step 1:

Fill a large tub with water. Their should be enough water to comfortably submerge the mold and deckle. Note the amount of water that you use by measuring the water level with your ruler. The water to pulp ratio that you use will effect the thickness and quality of the paper. This you will have to experiment with to get the paper thickness that you want.

Step 2:
Add the pulp, making note of how much you use.


Step 3:
Gently mix the pulp in the water so that pulp is evenly distributed in water and not accumulated on the bottom of tub.


Step 4:
Hold the deckle firmly to the mold with both hands at a 90 degree angle to the water. Make sure that your thumbs are placed on the deckle and do not overlap onto the screen.


Step 5:
Bring the mold and deckle into the water at a 90 degree angle and in one smooth motion, swivel the mold and deckle so that they are parallel to tubs' bottom and completely submerged, then raise the mold and deckle out of the water, keeping them perfectly horizontal.

If you bring the mold and deckle out of the water and they are not parallel to the water your paper will be uneven. Also, the mold will create a little bit of suction right as you are bringing it out of the water, causing some resistance. Don't hesitate when this happens, just bring the mold and deckle straight up.


Step 6:
Hold the mold and deckle over the tub in the horizontal position while the pulp settles on the screen and most of the water drips out the bottom.

Step 7:
Set down the mold and deckle on a flat surface and carefully remove the deckle. Try not to let water drip onto your newly formed paper as this will leave irregular spots in the paper.


Step 8:
Hold the mold at a 90 degree angle to your pressing cloth and carefully roll the mold onto the cloth until it is resting face down on the bed sheet (this is called "couching").


Step 9:
Press on the back of the molds' screen firmly and evenly, making sure to make contact with the entire surface including corners. This will help the paper stick to the cloth and separate from the screen. The paper will still have LOTS of water in it which will seep out and get everything wet, this is normal.


Step 10:
Slowly and carefully roll off the mold, leaving the new paper on the cloth. If only some of the paper stayed on the cloth and the rest is still on the screen, don't fret! This pulp can be put back into the tub to be re-used. Couching paper is tricky and will take a few tries to get the hang of.


Step 11:
Before pulling your next sheet of paper, you will need to add more pulp. I add about 1-2 cups of pulp after each sheet, but it will depend on the size of your cup and how thick you want your sheets.

Step 12:

Check screen to see if there is any paper pulp stuck in it. I usually throughly rinse my screen after every second sheet that I pull.

Step 13:

Repeat steps 3-10 until you have 2 sheets of paper on your pressing cloth.

Step 14:
Place a new pressing cloth (bed sheet) on top of your two new paper sheets and carefully smooth out wrinkles in the pressing cloth. Then place a blanket on top of that, and another pressing cloth on top of the blanket. Always make sure that the blankets and pressing cloths are lined up along the edges and free of wrinkles.


Repeat steps 3-14 until you have as many sheets of paper you want, or have run out of pulp, or have run out of pressing cloths and blankets. I have enough pressing cloths to make 24 sheets of paper at one time. This usually takes about 1 and a half to two hours or so which is a good amount of time for me. Keep in mind that there is a lot of bending over involved so if you are prone to back pain you will want to make less amounts of paper at a time. Take frequent breaks to stretch.

Now you know how to form sheets of paper! There's just one more installment to this tutorial where I will tell you how to dry your paper.

Saturday, June 5, 2010

A Paper Making Tale...

This is a story (a very long one) about how I came to work with handmade paper and the women of the Al-Falah Women's Cooperative. It's a meandering tale of a Peace Corps project that started a year and a half ago and which in many ways is only just beginning. It's a story with many twists and turns (and pictures!) that reminds us that nothing is ever as easy as we think it will be, projects usually take much longer than we expect, and a small seed of an idea can turn into something much bigger than ever anticipated.

This story begins back in November 2008 when I was visiting a nearby volunteer. He was gathering products from cooperatives around the country to take to the capital for a holiday craft fair for expatriates. One of the product lines to be sold at the craft fair was a group of embroidered greeting cards.


At that time I had just sworn in as a volunteer and had been working with my cooperative for a mere week or two. I had only a rudimentary understanding of the kinds of skills that they had. I saw some examples of embroidery around the workroom of the coop. Mostly this consisted of large table cloths with matching napkins, such as this cross-stitched table cloth seen below.


The embroidery always looked well done, but finishing work seemed to be an issue when they used a sewing machine, such as with the Fesi embroidered pillow case below.


Since large embroidered items such as these take a long time to make and tend to cost more than the average tourist wants to spend, I thought that greeting cards might be a good product for them to pursue.

If the women of the Al-Falah cooperative were going to start making greeting cards it was important that they be in a different style than what was already on the market. Though the embroidery styles of the two groups are totally different, I wanted to take things a step further and have the embroidery directly on the card, instead of having a "window" or somehow pasting some embroidered fabric to the card.

Before I presented this idea to the women I made a prototype to see if it would work. The only cardstock that was available in my town was pink. This was not ideal, but for a prototype it would do. I developed a way to transfer the design onto the card without adding any pencil marks or extra holes. I wanted it to look very clean and have good craftsmanship.


To do this, I drew out my design on graph paper that was the same size as the front of the card. Then, using an empty cardboard box as a work surface, I placed the template over the card and secured it on all corners with straight pins. I used another straight pin to make the additional holes. After I remove the template I'm left with just the holes and I use the original template with the drawing to then embroider the card. I was happy with this system, but very unhappy with the pink cardstock. If the project was going to move forward we would have to find a suitable alternative.


I worked on this project both at home as well as at the cooperative and the women seemed to have minor interest in what I was doing, though they did think it was strange that I was embroidering on paper.

Soon it was springtime. Jon and I heard of an annual event going on in southern Morocco called the Rose Festival. It was late April and work was going very slowly with the cooperative. I needed to get out and do some product research and this was the perfect opportunity.

The Rose festival featured several tents with different cooperatives selling their various wares. While browsing around the fair I met a Japanese volunteer (like a Peace Corps volunteer except from Japan). To my delight and surprise, she was also working with her artisans to make embroidered greeting cards!(see photo below) And, she had taught them how to make the paper themselves! Then it struck me. Of course! Handmade paper! This is exactly what we need to be doing!


In college I actually took a whole class on the subject so I had a very good idea about the process, but I earnestly grilled this volunteer to see how she was able to do it here in Morocco. The women that this volunteer worked with were doing a similar style of embroidery that my coop does (a style called "Fesi"), but they were doing it on fabric and pasting it onto the cards, so I still felt like the idea was different enough. Plus, I loved the idea of using materials that were otherwise going to be thrown away. It was the perfect recycling project too! The more I thought about it the more I was convinced that this was the direction we needed to take.

Back in our town, Jon and I spent the next couple of months gathering materials that we would need. The most important thing of course was to make a mold and deckle. Luckily, Jon had taken a paper making course at his school as well, but unlike me, he actually had to make his own mold and deckle for the class and had a better idea of how to construct it. Together we came up with detailed plans.

With this information, we went to one of the many carpenters in town. We didn't need him to actually make it for us- we were planning on doing that ourselves- we just needed him to cut the wood down to very specific measurements. This was very complicated. We wrote all the measurements down in centimeters, knowing that this is of course the standard measurement here. The problem seemed to be with the fact that many of the pieces needed to be cut to a size that wasn't a whole number. Some measurements required the use of 1/2 of a centimeter and some required 1/4 (but nothing smaller or more complicated than that). We stood by and watched him painstakingly measure and mark each piece and cut them. We had the feeling that he wasn't measuring correctly, but didn't want to embarass him in front of his boss. We later found out that every single length of wood (12 in all) were the wrong size. Luckily, all but two were longer than they needed to be, so using a hand saw that belonged to the coop that Jon worked with, he was able to correct these. He also borrowed a drill to screw together all the pieces.


After Jon assembled the mold and deckle I lacquered the whole thing, using several coats and then stapled on two screens; the first one metal with large openings the second one plastic with much smaller holes.

Now that the hard part was over I started to gather the other necessary materials...an extra large tub, a wooden board big enough for two pieces of paper (which also needed to be lacquered), sheets and blankets cut down to the same size as the board, and a blender. Our roof provided the perfect workspace, complete with a conveniently located faucet and drain.


By now it was high summer and the cooperative was on vacation for the entire month of August. This was fine, as I needed time to work out all the bugs in the process. I started making paper myself, trying out different mixtures of materials. At first I was using milk cartons (an idea from the Japanese volunteer), but I soon realized that this wasn't going work very well because before they could be made into paper they had to be separated. To do that they needed to be boiled...it just took too long and too much energy, both my own and that of my buta gas tank. Toilet paper rolls seemed to make the strongest paper and also gave an nice warm color. I also mixed in plenty of egg cartons (free and abundant at every corner store) and Laughing Cow "cheese" boxes. The Laughing Cow boxes need to be soaked first and the labels peeled off, but this is not very difficult.


Now I was making paper! In early September I held a training of trainers for other volunteers who thought they might want to try their hands at making paper with their own cooperatives.

Soon it was Ramadan, and though the women were now back from vacation, their schedule and energy level had completely changed (understandably). At this time I was making as much paper as I could so that I could get it into the hands of the cooperative women and see if they'd even like working with it. For every batch I tried different ratios of pulps and water, trying to get the perfect blend. I made up some new samples (below) and trained them in the technique that I developed. To my relief they absolutely loved embroidering on the cards!


Shortly after my tutorial on how to embroider on the cards, Jon and I took a vacation back to the States for three weeks. By the time we got back it was mid November and getting cold. Since paper making uses so much water (which is very cold to work with when it's cold outside), and winter is a very rainy and wet season (bad for drying paper), training the women how to make the paper themselves was put on hold.

By this time I had lots of paper already made, so they used this to embroider about 30 cards to test market on Peace Corps volunteers and staff during mid service medicals in December.

These first cards were designed so that a flap of paper would fold over the back side of the front, thus hiding any "ugliness" of the "wrong side" of the embroidery. You can kind of see what I mean with the photo of Fatima (below). This was a consequence of the fact that I had not learned the proper way of embroidering Fesi designs. A true Fesi design looks just as good on the back as it does on the front.


Though I gave them a couple of templates to work from to get started (these were based on traditional Fesi designs, but modified slightly), I encouraged them to draw their own designs and use colors that they wanted to use. They took to this right away and came up with some really great stuff. Every couple of days we'd all look at the cards and talk about their craftsmanship. I was careful not to hurt their feelings, but I wanted to be honest with them when I saw something that wasn't up to standard, like if the design was crooked or if the card was all wrinkled. For things like color choices I told them what colors I liked (and possibly tourists as well), but stressed that my opinion on this wasn't the end-all-be-all and that we should see how they sell anyway.

We got so much great feedback from other volunteers and staff in December (see photo below). All but two of their cards sold! This was very encouraging for the ladies and they eagerly wanted to continue with the project and stressed that they'd like to learn how to make the paper themselves, though they understood that they'd have to wait until after the rainy season.


As luck would have it, we had one very sunny, warm, and dry week in January. I knew that this was a fluke and the weather couldn't possibly stay like this for long (and I was right). So I took out all my equipment and worked really hard to make another batch of 24 sheets of paper, this time trying to get really thick sheets.

I used this extra thick and strong paper to make some adjustments to the design. By this time Hafida had taught me how to embroider the proper way and I wanted to showcase the fact that this embroidery does look good from both sides. I also added an insert sheet of "regular" paper (made from recycled paper), which would be better suited for writing. The photos below is my prototype.
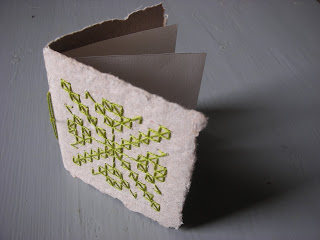


Again the women were very receptive to the new design and started embroidering a new batch of cards for the upcoming Marché Maroc Craft Fair in Marrakesh. The quality of each card was better and better and they came up with some really great designs! Below are just some of the 50 cards they made for the fair! (for another image of the cards from the fair see the previous post)


In addition to changing the structure of the card, we also changed the design of the envelope slightly by elongating the closing flap and adding a slit so that the flap would stay closed when inserted.


The women don't have a lot of opportunities to sell their products, especially something like this, which is geared specifically toward a non-Moroccan buyer, so the Marché Maroc Craft Fair in Marrakesh was going to be a very big deal for them. It was important that their products really stood out at the fair. I wanted them to have a really nice display so I started brainstorming some ideas settling, for now, with the display below.


In mid March the weather finally started to clear but as luck would have it, I suddenly developed pneumonia and was unable to work at all for more than two weeks. By the time I got back to work we only had about two weeks left before the Craft Fair (called Marché Maroc) and there wasn't enough time to teach the women paper making because they were busy making their other products. Plus I was in charge of designing all of the marketing materials for the fair which was also very time consuming. So I resigned myself to the fact that it would have to be put on hold yet again.

During the fair I was informed by the organizers of the next upcoming Marché Maroc Craft Fair (in Rabat) that my coop would be able to attend that one as well. This was great news but the craft fair in Rabat was only another two weeks after the one in Marrakesh, which meant that they would again be busy stocking up on other products (mostly crochet).

So, more waiting...

About a week after returning from the craft fair in Rabat I was FINALLY able to teach two women from the cooperative how to make paper! I set the date for Wednesday May 19 and was determined not to push it back any later than that. A couple days before the big day we had a change in the weather and a thunderstorm came through our town, which is very unusual.


Then the day before the workshop I started to see these nasty bugs around outside that look like what we call ear wigs in Ohio. But I didn't think much of it. Then on Wednesday I really started noticing them when I walked to the Artisana where I was meeting the women to lead them back to my house. Hafida was running late and we waited an hour before we could start the workshop. We started inside tearing paper and blending it up then moved to the roof. By this time these bugs where EVERYWHERE! They where landing on us, in the tub of pulp, in the buckets, on the wet paper...I couldn't believe it, of all days! We later heard from several sources that this was very unusual. I guess it was just the right circumstances due to weather. But seriously, it was like a plague of these ugly insects had descended on our town.

But we soldiered on and made some paper anyway. Since it was Fatima and Hafida's first time, and because we where competing with the bugs, we only made about 12 sheets of paper that day. I was very impressed at how quickly they picked up the process, even better than some of the volunteers who I taught back in September. This is really a commendation because with the volunteers there are zero language barriers. Hafida and Fatima acted like they'd been making paper for years! When they did make a mistake they had no problems redoing the process until they got a nice sheet. And besides the bugs and the heat (it was also a scorching hot day), they assured me that they really enjoyed the process!


We haven't done another paper making session since that day. Once the papers were dry I brought them to the Artisana where we ripped and cut them down to make 18 cards and envelopes. They haven't embroidered any of them yet, as they are currently working hard to finish an order (of embroidered t-shirts) for an American company, Mushmina.

This is the end of my paper making tale today, but as you can see we are far from finished. In my estimation, it will take at least a couple more sessions before they will be confident in their abilities and able to pass on their skills to the other members of the cooperative. I really want to see this project continue and be sustainable for them. I want them to completely own it. I want to believe that this project will be an activity that is enjoyable for them as well as one that they can take considerable pride in.